PCB Solder Wick

The Ultimate Guide to PCB Solder Wick and Wicking.

directory

What is a solder wick?

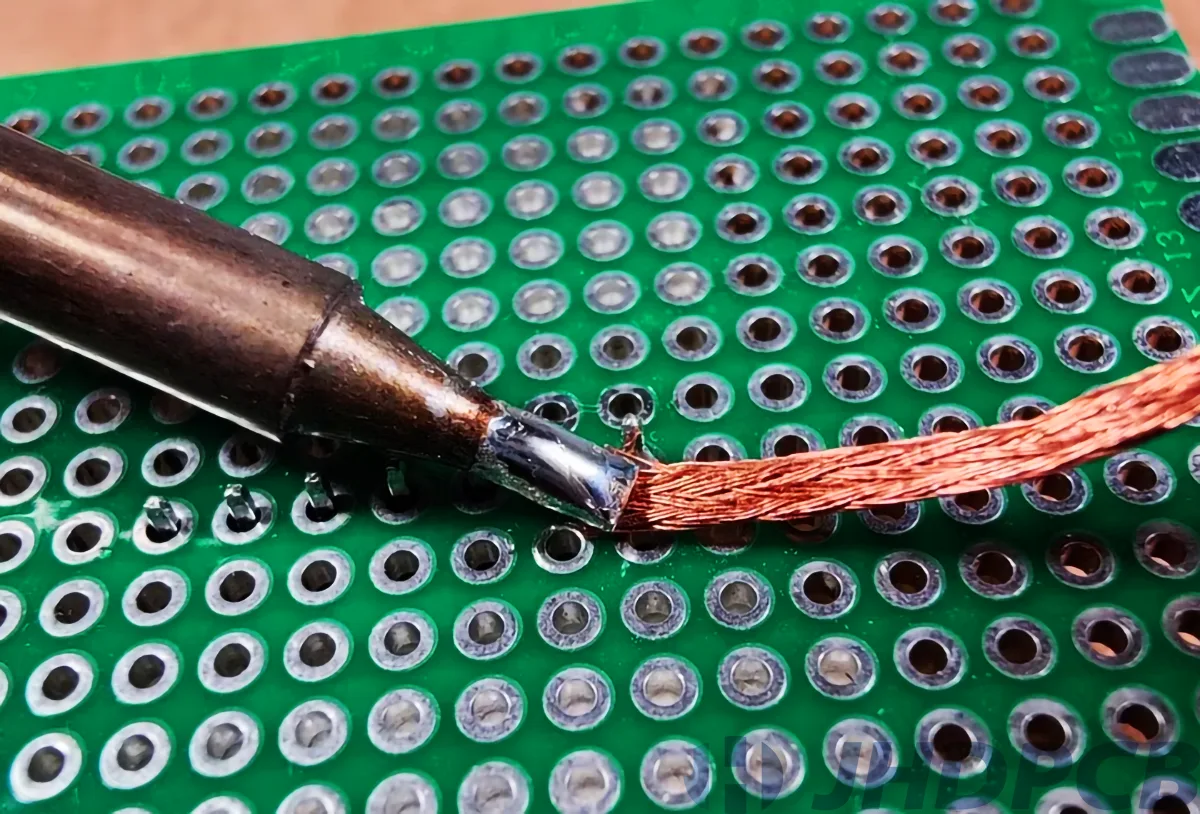
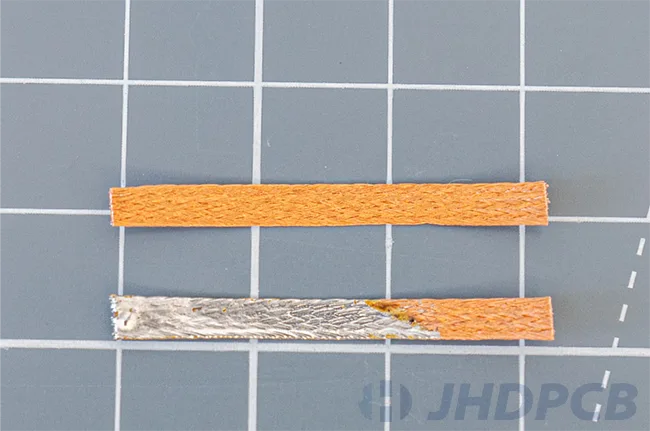
Solder wick, also known as desoldering braid, desoldering wick, or solder braid. It is used to remove the solder during solder re-working process or remove some already soldered components. Soldering wick/braid comes in a coil with strands of copper wire woven together. Copper performed well as a good conductor of heat and attract solder when heated, so the copper braid will remove the solder in a specific isolated area without damaging the entire circuit board or components nearby. A copper solder wick is an easy and effective way to remove solder from a circuit board without causing thermal stress. Of course, it also has different length, widths, and some desolder wicks come with flux to make the removing process easier.

The process of removing the solder commonly by heating the wick placed on the soldered joints or areas with soldering iron to heat all of them to activate the flux, thus the wick sucks the solder and remove the solder fast and effectively. Solder wick is typically used to help removing failed components, correcting solder bridging problems, or any other scenario where it is necessary to remove solder. Note that the wick solder is not reusable in most situations, once it has been applied and saturated with solder, you must drop it and apply with another new length of clean copper solder wick.

solder wick

Characteristics of solder wicks.

Desoldering wick (AKA solder wick) serves as an extremely convenient and inexpensive material for removing solder from electronic components or circuit boards. It is relatively cost-effective and easy to utilize than other solder removal methods, by comparison. The wick features super flexibility and portability, which makes it perform well in repairing or redoing PCB boards at home or in a professional setting. The summary of benefits and disadvantages of solder wicks are shown below.
Benefits of Solder Wicks:

  • Significantly lessen reworking or repairing time by sucking circuit board solder residue. Click to view more PCB rework and repair information.
  • Protect the fragile components or electronic circuit boards from damages during soldering/reworking/repairing.
  • Quickly and efficiently remove excess solder material while completing hand soldering rework.
  • Removing components that have been soldered to connect to other components, solder bridge removal and general tidying up of solder areas or joins.
  • Soldering wick is available in different sizes depending on the amount of solder you want to remove.
  • Supplied on a spool or pre-cut strands.
  • Relatively cost-effective and simple to use compared to other methods of solder removal.

Disadvantages of Solder Wicks.

  • Solder wicks can only be used a limited number of times before they become saturated and lose their effectiveness. You cannot reuse the desolder braid and have to remove the used braid and start with a clean segment.
  • Using solder wicks requires applying heat to the area being desoldered, which can potentially damage delicate electronic components if not done carefully.
  • Solder wicks can leave behind small amounts of residue, which may need to be cleaned off using other tools or solvents.
  • When using a copper solder wick to remove excess solder, the braid can become very hot and difficult to hold. It is important to use proper tools, such as tweezers or pliers, to hold the braid instead of trying to hold it with your fingers.
  • Removing solder from pin holes is more challenging than from surface mount components or through-hole connections.

Desoldering braid is definitely a practical and economical solution for eliminating solder, making it an ideal option for anyone seeking a highly effective technique to eliminate solder. While featuring many advantages that make it a great choice for individuals or manufacturing with electronics, it is crucial to realize its limitations and apply it appropriately to get the optimal outcomes.

How to choose the correct desoldering wick?

Desoldering wicks are commonly available in spools of 1.5 meter (5 ft) and 3 meter (10 ft), which also known as bobbins. Larger spools ranging from 25 to 500 feet.

Desoldering wicks are available in a wide range of widths starting at 0.8 mm and going beyond 5 mm. In most cases, the recommended width of soldering braid is either the same as the size of the pad or slightly larger in most situations. If the soldering braid is too small, it may not be able to remove all the solder from the entire pad. On the other hand, if it is too large, it may accidentally remove solder from neighboring pads that were not intended to be desoldered. Moreover, smaller braid widths are not easy to control during the desoldering process, which increases the likelihood of accidentally scratching or delaminating the pads on the PCB. Using a desoldering wick that is too wide can also increase the thermal mass and prolong the time needed to desolder components. This can increase the risk of damaging both the components and the PCB pads. It is important to select the best solder wicks for your desoldering needs and here are 1 tables for your reference.

Different Desoldering wicks:
Color codeWidthTypical application
White.030″/0.8mmSMD, micro-circuits
Yellow.060″/1.5mmSmall pads, SMDs
Green.080″/2.0mmmedium pads
Blue.110″/2.8mmlarge pads
Brown.145″/3.7mmTerminals
Red.210″/5.3mmlarge lugs, BGA pads and chips

The different types of desoldering braids.

Solder wick is offered with or without flux, and there are several types of flux available. Flux is beneficial as it assists in cleaning the surface that is being heated, promoting the flow of solder. For more detailed flux knowledge, you can go to our corresponding blog to learn about it. It is generally recommended to apply flux to a wick that is not pre-coated with flux or if the existing flux has deteriorated due to age. If you prefer using no-clean solder during workflow (as you want to skip cleaning), it is recommended you to use a desoldering braid applied with no-clean flux. If you pursue cleaning PCB assembly post rework, rosin fluxed desoldering wicks feature the quickest wicking performance. Here are kinds of desoldering wick flux available, each having distinct characteristics and intended for specific uses:

  • Rosin Based Desoldering Braid: As the most widely used type of desoldering braid flux, rosin fluxed desoldering wick boast fast wicking action. Nonetheless, it leaves behind residues that require diligent cleaning. This type of desoldering braid start with part number “80-“ or “50-“ can be found in the Solder-Wick line.
  • No-Cleaning Desoldering Braid: If you want to avoid the need for cleaning after desoldering, consider using a braid with No-clean flux. This type is a suitable choice for applications where cleaning is not possible or difficult to operate. The residue left behind after desoldering is a clear, non-ionic residue. This type of braid can be useful for field work, where thorough cleaning may not be practical. You can find this wick type in the Solder Wick product line, identified by a part number beginning with “60-“
  • Unfluxed Desoldering Braid: This braid type does not come with any flux, requiring the operator to apply flux separately. In situations where a specific flux is required and cannot be altered, such as in production or repair environments, or when an aqueous flux is necessary, this type of braid allows for the addition of your own flux. Without the use of flux, unfluxed wick cannot effectively remove solder. Unfluxed wick has a part number that starts with 75- in the Solder-Wick line.

Choosing a desoldering wick flux that is compatible with your desoldering wick, solder type, and surface material, which is crucial  for a successful desoldering process.

How to use soldering wick?

We need to do some preparing works before using a soldering wick. Firstly, select a wick of the appropriate size for the solder that needs to be removed, making sure it’s similar in width to the glob of solder. Using a wick that is significantly different in width can make the removal process more challenging. Additionally, choose a tip for soldering iron that is reasonably close in size to the wick being used. Furthermore, it’s crucial to choose a desolder wick with the right flux type. Once you’ve taken these preparing works, you can proceed to use the wick to remove solder effectively. Here are the specific steps to use a desoldering wick in a right way.

Make sure the soldering iron is to the required temperature, which is influenced by the following factors. Contemporary electronic devices commonly utilize lead-free solder. As a result, the joints in these devices require soldering iron tip temperature within 570 °F (300 °C) – 660 °F (350 °C). However, DIY PCBs using lead solder need lower temperatures ranging from 520 °F (270 °C) – 570 °F (300 °C).

Make sure your soldering iron tip is tinned to ensure optimal heat transfer between the braid and the solder. Position the tip at an angle that will allow for maximum heat transfer, and make sure to use a clean tip that has just been tinned with solder. When heating the copper, be mindful that the heat will be traveling upward, and take care not to accidentally burn yourself.

If you are about to use an un-fluxed desoldering braid, you have to employ flux to all joints/pads that you intend to desolder. All in all, adding extra flux can make the job much simpler and faster to remove stubborn joints, regardless of the specific type of desoldering wick being used.

Apply Flux

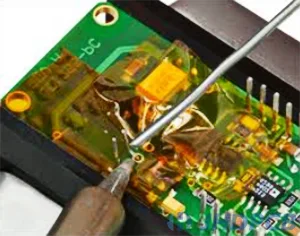
Placing the soldering wick directly over the areas that you want to remove. Since the wick can become very hot, it’s crucial to avoid handling it with your bare hands. Instead, use a spool to hold the wick solder or a pair of tweezers to handle it safely.

Gently press the tip of the soldering iron onto the top of the wick. Make sure to angle the tip in a way that maximizes the contact patch, as this will improves thermal linkage and allow the job to be done more quickly. Additionally, this step will also help to minimize any potential damages to the circuit board components.

As you heat the desoldering braid, it will change color from copper to silver in just a few seconds. This is an indication that the braid has successfully absorbed the solder. Remove the wick and soldering iron at the same time. If you remove the iron first, the wick may become soldered to the board. In such an event, you will need to reapply flux and then reheat the affected section with the soldering iron. Finally, you can safely lift the wick solder and tip away from the PCB together.

After a section of the desoldering braid has become fully saturated with solder, it’s no longer useful and should be dropped away immediately. To do this, simply use a pair of flush cutters to snip off the saturated section. Once you have removed the saturated braid, you can proceed with the desoldering process again to remove the remaining solder from the component’s connections. Continue this step until you have successfully removed enough solder from all of the necessary connections.

Dispose of the used soldering braid and ensure that you thoroughly clean the work area. This step is also indispensable, which will help you save time during your next soldering or desoldering process.

Overall, desoldering wick is a useful tool in the process of removing solder from electronic components. By following these steps outlined above, you can use desolder wick effectively and safely to remove components from PCBs. It is important to note that desoldering wick may not be suitable for every job, but it is certainly a helpful item to have available for quick fixes. The most important is to make sure safety when using hot tools, and discard used wick and clean the work area for optimal performance and safety in your next job.

Application of desolder wick.

The combination of different fluxes and braid widths allows desolder wick to be used in a wide variety of applications, which help with the removal of unwanted solder or re-working old solder. It is most often used in removing solder from items such as printed circuit boards (PCBs) and other electronics, re-working and removing old solder that no longer has an effective join, or taking apart electronic components that have been soldered together. The following is a brief summary of the application of the desolder wicks.

  • Wire Wrap Pins: Easily remove solder pins, eliminate potential intermittent issues and get rid of any solder buildup.
  • Lugs/Posts: The soldering wick can fully remove any solder splashes or drips, Leaving the terminal fluxed and prepared for resoldering.
  • Components: With the desoldering braid, to easily eliminate solder from components with straight or clinched leads, requiring only minimal heat and without causing any damage to the board or components.
  • SMT Pads: Efficiently desolder entire rows of SMT pads in a speedy and secure manner. Additionally, specific sizes are available for desoldering individual fine-pitch SMT pads.
  • BGA Pads: The BGA pads and chips can be safely and easily desoldered in three to four passes. The process can fully remove any remaining solder and allows for easy repositioning of the chip.
  • Solder Bridges: Completely eliminates solder bridges, preventing potential shorts and causing no damage to the circuitry or boards.
  • Clean Script: Can also be used to selectively touch up etched script, resulting in improved aesthetic appearance and eliminating secondary identification. Easy to use and operate.
  • Excess Solder: If too much solder has been applied, desoldering braid can be utilized to eliminate the excess solder and clean up the joint.
  • Finger Connectors: Cleaning finger connectors and surface mount pads.

Solder wicks are produced with diverse specifications such as lead-free, anti-static and no-clean, aiming to provide an easier and more effective desoldering process across various applications.

What is solder wicking/solder escape/wicking solder?

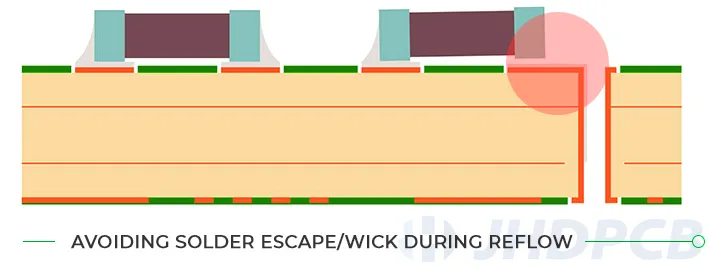
Solder Wicking, also known as Solder Escape, Solder Wicking or Solder Drainage, is a common issue in various PCB assembly processes such as cable assembly, PCB manufacture, and reflow soldering. It occurs when solder flows away from the pad on a PCB, resulting in dirt accumulation on the surface and potential damage to the holes and tracks. Solder wicking is a serious problem where the issue is of solder climbing up on to the lead of a component. Here are some reasons for solder escape (solder wicking):

  • Thermal dissipation: During the reflow process, heat flows away from the pad on the PCB to a larger area with higher thermal conductivity that is linked to the pad and unprotected by a solder mask dam, causing the solder to flow towards via holes, copper areas, and larger tracks. Vias and copper tracks are evidently not protected by the solder mask layer, which makes them more vulnerable to the problem of solder wicking. In severe cases, the solder can reach the backside of the board through the via, forming ‘bumps’ on top of it.
  • Low melting point of component terminal: In general, the component terminal has a lower melting point than the pad to which it is being soldered. This means that the component terminal tends to melt before the pad, causing the solder flows away from the pad and accumulates in unwanted places. See the image below, Solder is placed on the pads on to which a component is placed. Once the component is soldered on to the pad, the solder melts and flows towards the via hole and surrounding areas.

    Low melting point of component terminal

  • Varying reflow profiles: The varying reflow profile of the solder material is also a factor for the solder wicking. This varying reflow profile depends on the amount of Tin and Lead (Pb) utilized, while preparing the solder alloy.
  • Lead reaching liquidus temperature before the pad: If the molten solder is able to wet the surface with sufficient wettability, it will be attracted to the hotter surface before the pad completely solidifies due to the lead reaching its liquidus temperature.
  • Solder on leads melting faster than on solder joint: The solder on the leads melts as a quicker rate compared to the solder joint, causing the molten solder paste to be drawn away from the pads.
  • Non-wetting problems: Solder wicking can also be caused by non-wetting problems, like insufficient plating thickness, contamination or oxidation, and problems of surface treatment.

How to prevent solder wicking?

By more attentive to the summarized parameters, it is possible for you to prevent the occurrence of solder wicking:

  • The temperature difference between pad and terminal:
    Where there is a large temperature difference between the pad and the lead, there is a higher risk of solder flowing towards the lead, which can cause wicking. To prevent such thing, it is necessary to reduce the temperature difference between pad and lead.
  • Wettability of pad i.e. its joining capability:
    Pad wettability or PCB surface is a crucial parameter in preventing solder wicking. If a surface can be easily wetted by solder, will aid in keeping the solder to the intended location.
  • Gap dimension between pad/lead:
    The gap dimension between pad/lead refers to the distance between the metal pad on a circuit board and the lead of the component that will be soldered to it. The gap’s size can impact the solder’s wetting ability and the probability of wicking.
  • Melting time of solder at the rivet:
    The solder melting time is also an important factor. Fast solder melting may flow to unintended areas before the pad has had a chance to heat up. Slower melting can help prevent wicking.
  • Heat sink at the conductor:
    You can use the heat sink to dissipate heat and divert attention away from components, thereby preventing damage due to overheating. The heat sink needs to be heated up in advance, and increased convection heat should be applied from the bottom!

When paying more attentions to these, it is possible to minimize the occurrence of solder escape, ensuring high-quality solder joints and reliable electronic products.

Solutions to common problems with solder wicking.

Solder wicking refers to the unwanted migration of solder to surfaces where it is not intended. Solder wicking has some common issues may lead to poor quality or dry solder joints. It is important to be aware of the common problems and their corresponding solutions of solder wicking, as outlined below.

PCB Solder wicking through unmasked vias to backside of the board causing unacceptable bumps on top of vias.

Solution: One solution is the use of a Kapton tape to cover the unmasked vias on the board, preventing molten solder from leaking through during the soldering process. After the soldering process is complete and the PCB has cooled, the tape can be removed easily. Kapton tape boast that it does not degrade when exposed to reflow temperatures. This cost-effective and user-friendly approach serves as a temporary fix for the problem at hand.
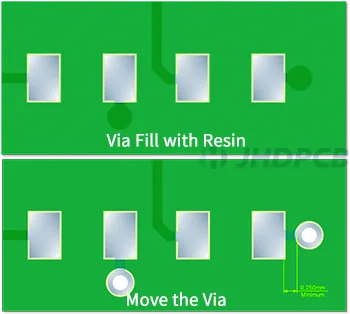
Kapton tape

Insufficient distance between a Via Hole and an SMD pad can lead to poor quality or dry joints due to the flow of solder being diverted towards the hole by the effects of surface tension (meniscus effect, capillary action) and heat dissipation.

Via Hole is too close to SMD pad

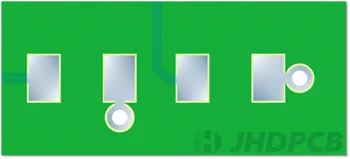
Solution: Using the Via fill with resin technique is a great way to solve this problem. This method involves the Via Hole being fully covered with Soldermask, which prevents the solder from flowing away from the SMD pad. Another solution is to relocate the Via hole to meet the minimum required distance, which allows a soldermask web/dam between the SMD pad and the Via to prevent the solder from flowing away.
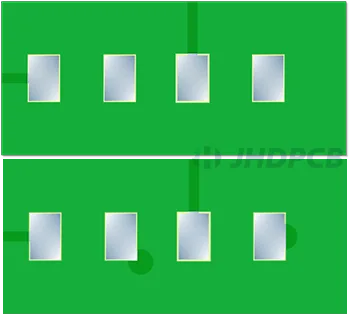
Via Fill with Resin and Move the Via

As the trend of miniaturization electronics continues, Via Holes in SMD pads have emerged as a good solution to maximize PCB real estate. However, the issue associated with this method is that solder flowing from the SMD Pad into the Via Hole, which lead to a dry or weak solder joint of the SMD pad.

Via Hole in SMD Pad

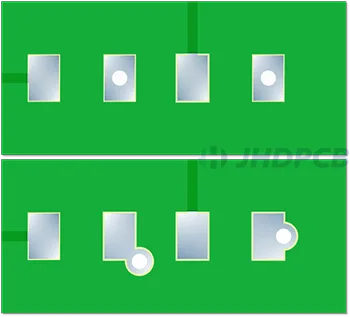
Solution: As the same of problem 2, this issue can also be solved by using the Via fill with resin technique or move the Via hole.
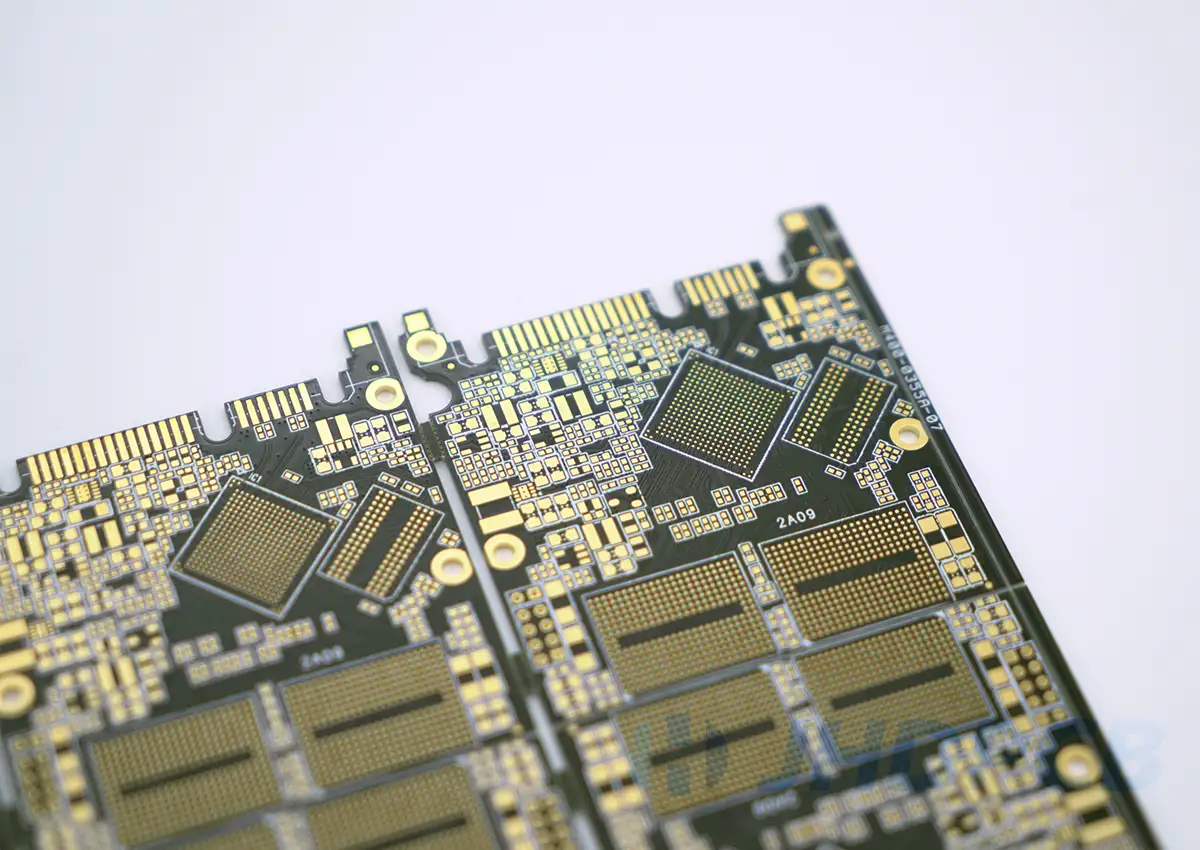
Via Filling with Resin

IC chip manufacturers prefer to utilize the body as a grounding connection or for heat dissipation, sometimes even both. To achieve this, they suggest a copper area beneath the main body of the IC, along with a matrix of Via Holes. But it will let the solder seep into the Via Holes, resulting in weak or dry solder joints. Furthermore, without X-ray inspection, it can be challenging to ensure the solder quality. (While the IC chip manufacturers recommend the use of Soldermask or tenting around the Via Holes to prevent Solder escape, this may reduce the available area for soldering, probably impacting the quality of the grounding connection or heat dissipation effectiveness.)

Via Holes under an IC Body

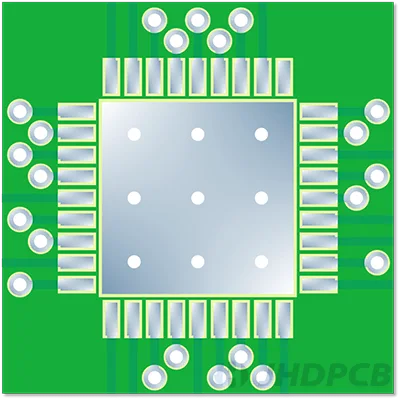
Solution: Using Via Fill with resin is the only and effective solution for ensuring proper soldering of the IC body to the copper area, which create strong bond between the IC and the copper surface.

Overall, desoldering wick is a useful tool in the process of removing solder from electronic components. By following these steps outlined above, you can use desolder wick effectively and safely to remove components from PCBs. It is important to note that desoldering wick may not be suitable for every job, but it is certainly a helpful item to have available for quick fixes. The most important is to make sure safety when using hot tools, and discard used wick and clean the work area for optimal performance and safety in your next job.

FAQ of Solder Cores.

The desoldering braid, also soldering wick, is constructed using fine strands of ultra-pure copper that are woven and coated with flux. Its precise geometric weave design enables optimal capillary action and solder capacity.

To create a copper solder wick, you can use a piece of stranded copper wire. First to strip the wire and intertwin the strands. Then dip the wire into flux. Your DIY wick solder is now ready to be used for desoldering tasks.

Yes, it is necessary to cut off the used soldering wick. When the soldering wick is fully saturated with solder, it is no longer useful, and you must cut it off. This will allow you to reuse the remaining portion of the wire for future soldering tasks.

Yes, the solder wick is made of copper, it can become ineffective over time when exposed to atmospheric air as it will interact with the oxygen and oxidizes. This can be observed through dark color of the wick when it has expired.

Solder wicks have a limited lifespan and can only be used for a certain number of times before they become saturated and lose their desoldering effectiveness.

Yes, cleaning excess flux after soldering process is crucial because flux is a highly reactive chemical agent. If left on the metal, it can react and corrode the metal surface. On top of this, the flux can also weaken the strength of the joint.

Yes, although it’s possible to desolder without using flux, applying flux makes the process much easier to desolder. Flux interacts with the solder joints and weakens them, which provide you with efficient to desolder and break apart.

Soldering wick is a tool made of braided copper wire that is used to remove excess solder from electronic devices. It is one of the easiest methods to desolder a PCB and remove unwanted solder. The wick has some absorptive ability, which allows it to effectively remove the excess solder. Additionally, using solder wick can reduce the risk of soldering mistakes and damaging electronic devices. If you have any questions or comments about solder wicks and solder wicking, please leave a comment below or contact us for more help.

Get a PCB Quote Now

Open high-quality PCB manufacturing services in JHDPCB

Leave a Comment